In this guide, we'll walk you through installing and using Claude Code on a Mac — even if you have zero coding experience.
You’ll learn the exact steps to get Claude Code running from scratch, what plan you need (or don’t), how to point Claude to project folders, and practical non-coding ways to use it safely and efficiently. If you want to turn Claude from a web chat into a tool that can read files, edit documents, run multiple research tasks, and interact with the web — this is the walkthrough for you.
Quick overview: what Claude Code is (and isn’t)
Claude Code is a separate CLI application (it runs inside Terminal on your Mac) that gives Claude programmatic access to your files and OS. This is different from the web portal where Claude runs in a sandbox. On the web you can chat and build small applets, but Claude Code moves Claude out of that sandbox and lets it plan and perform actions on your machine.
Important things to know up front:
It runs in Terminal — so you’ll use basic Terminal commands to launch and control it.
You don’t need to be a coder. If you can drag a folder into Terminal and run a few commands, you’re fine.
API option: Instead of authenticating with your account, you can provide an API key and pay per usage.
What you’ll need before installing
Before you try the install command, make sure your Mac has Node.js installed. If you try the recommended installer and get “command not found” or an npm error, it’s because Node.js is missing.
Go to the Node.js website and download the installer for macOS.
Run the installer and finish the setup.

Install and start Claude Code (step-by-step)
In terminal, run the Claude code installer.
npm install -g @anthropic-ai/claude-code
If the install still fails because of permissions, prefix the command with sudo (you’ll be prompted for your admin password). That will allow the installer to write the necessary files.
Once installed, the workflow is simple:
Create or identify a folder you want Claude Code to use as a project workspace. Claude Code treats a folder as its “home” for that project and stores working files there.
Open Terminal and change directory to that folder using cd. If you hate typing long paths, just drag the folder into the Terminal window — macOS will paste the path for you.
Type claude and press Enter. That launches Claude Code inside the folder you’re in.
Follow the prompts to authenticate: you can sign in with your Claude account or paste an API key.

When you first run Claude in a folder, it will ask about settings, whether you trust files in the project, and general permissions. This is normal — Claude Code requests consent for each action it will perform and will prompt you before altering files unless you give permission for the session or the project.
Why per-folder projects matter
Claude Code remembers context per folder. That means:
One folder = one persistent project memory. Claude will reuse the conversation and file context for that folder the next time you launch it from there.
You can have multiple projects in different folders, each with its own persistent state.
This makes Claude Code naturally suited for organizing separate projects — writing, research, scripts, or codebases — without cross-contamination.
Give Claude context: the claude.md file
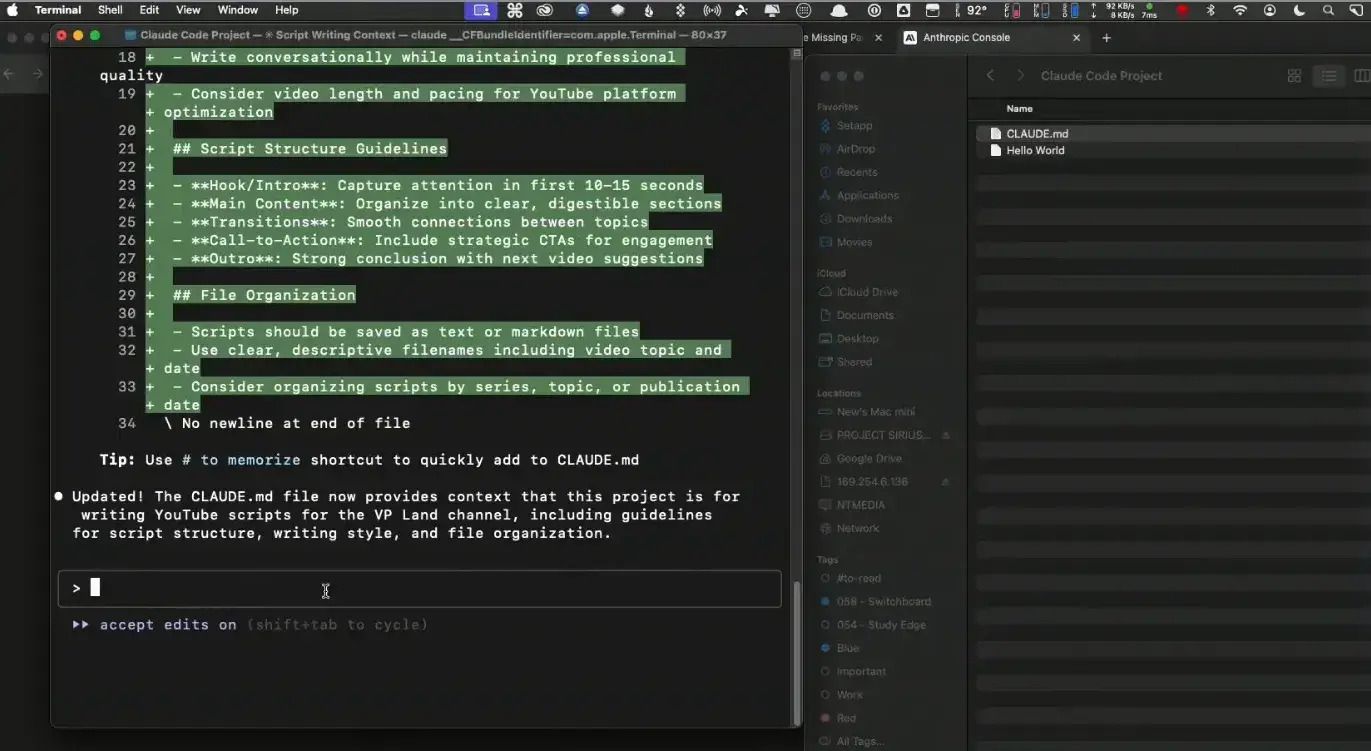
One of the most powerful tricks is creating a claude.md file in your project folder. This is a markdown file Claude uses as long-lived instructions or memory for the project. Create it with the built-in init command:
In Claude Code type / to open command options, then type init to initialize a new claude.md.
Edit claude.md to include project rules, style preferences, your voice, or any instructions you want Claude to always keep in mind.

For example, you could add: “You are a writer for VP Land. Draft scripts in my voice. Use short sections.” Every time Claude runs in that folder, it will reference that file and the project will feel customized.
Plan Mode vs action (accept edits) mode
Claude Code gives you two important modes that change how it behaves:
Plan Mode: Claude thinks and lays out a plan but will not change files. Use this when you want to review steps before anything is executed.
Action mode (accept edits on): Claude will make changes to files, create documents, and execute tasks.
Toggle between modes with Shift+Tab or by checking the accept edits indicator. In Plan Mode, Claude will present a checklist (e.g., create markdown file, write intro, write chapter 2) and ask for your approval before executing. This is especially useful when you’re iterating on drafts or working on important files and want control over each change.
Practical non-coding use cases
Although Claude Code is built with developers in mind, it’s surprisingly useful for non-coders. Here are ways you can use it right away:
Content creation: Have Claude draft outlines, write scripts, or format blog posts into markdown files and save them directly into the project folder.
Research: Ask Claude to research a topic, pull highlights, and save findings into documents or tables.
File management: Instruct Claude to create files like “hello_world.txt” or reorganize assets inside the project folder.
Multi-tasking with sub-agents: Run multiple agents simultaneously to handle parallel research or comparisons (more on sub-agents below).
Model selection and saving credits
Claude Code lets you choose which model to use. On Pro plans, you’ll have Sonnet available in the CLI. On Max plans you’ll see Opus and Sonnet options. The CLI default behavior may use Opus for a portion of usage and fall back to Sonnet.

A recent feature called Opus Plan Mode is worth switching to: it uses Opus for planning and Sonnet for execution. That means you get the context-rich thinking power of Opus when designing or planning tasks, while using a lighter (and cheaper) model to actually write files and execute actions. This can dramatically reduce your credit usage without compromising planning quality.
Running multiple tasks: sub-agents
One especially powerful feature is the ability to launch sub-agents. These let Claude run several tasks in parallel inside the same project without opening new windows. For example, you can:
Launch three agents to research the latest cinema cameras from Blackmagic, ARRI, and RED simultaneously.
Have each agent pull web research, summarize specs, and return findings independently.
Combine or consolidate agent outputs into a single comparative document.

When you launch web-accessing agents for the first time, Claude will ask for permission to access the web. You can allow it for the session or set “don’t ask again” for web search commands if you trust the workflow.
Working with external files and web access
Upload files to Claude Code by dragging them into the terminal window or placing them in the project folder and referencing them with the @ sign. Claude can read and edit markdown, text files, and other formats it supports.
Claude Code can also access URLs and do web research. Combine web access and file uploads for workflows like:
Collecting sources from the web, saving quotes into a research.md file, and drafting a summary.
Giving Claude a folder of transcripts and asking it to extract highlights and produce a social media-ready summary.

Tips, security, and troubleshooting
Practical tips to avoid friction:
Use project-specific folders to keep tasks isolated and persistent context clean.
Keep claude.md concise but specific — bullet lists of voice, format, and file locations are extremely effective.
Prefer Plan Mode when first testing a workflow so Claude doesn’t accidentally overwrite things.
Switch to Opus Plan Mode if you’re on Max — saves credits while retaining better planning quality.
Give permissions carefully. Claude will always ask before actions; only approve projects and web access for folders and tasks you trust.
Common troubleshooting:
If the install command errors, confirm Node.js is installed and re-run with sudo.
If Terminal says command not found for claude, ensure your PATH includes the npm global bin or re-run the installer.
If output is unexpectedly short or incomplete, check whether you accidentally kept Plan Mode on or limited the agent’s web/file permissions.
Examples of prompts and workflows
Here are practical prompt examples to get you started:
Create a markdown brief: “Plan: create a 1-page brief with sections: Overview, Key Points, Sources. Then execute and save as brief.md.” (Use Plan Mode first.)
Parallel research: “Launch 3 sub-agents to research Blackmagic, ARRI, RED cameras. Save each report as camera_blackmagic.md, camera_arri.md, camera_red.md.”
File editing: “Open script_draft.md, suggest a short intro paragraph in my voice and insert it under the Intro heading. Show plan then execute.”
Where to go next
You don’t need to be a developer to get massive value from Claude Code. Start small — make a project folder, initialize a claude.md, and try a Plan Mode task. Once comfortable, experiment with model switching, sub-agents, and web-connected research. Over time you’ll build templates, recurring commands, and automation that shave hours off repetitive tasks.

Final thoughts
Claude Code opens up capabilities that the web chat can’t touch: persistent per-folder memory, file access, multi-tasking agents, and deeper planning. If you’re curious about non-coding uses — content creation, research, file organization, or automating small tasks — Claude Code is worth exploring. Keep an eye on model selection to manage credits and always use Plan Mode while refining workflows to avoid accidental edits.
If you try Claude Code, start a small, trusted project and experiment. You’ll quickly get a feel for how it thinks, plans, and executes. And if you’ve found creative non-coding uses, or stuck on a use case you can't solve, share your experience — collaboration often sparks new workflows.
Happy experimenting — and if you want more deep dives on how we use Claude for content and workflows, there will be follow-up guides and examples soon.


